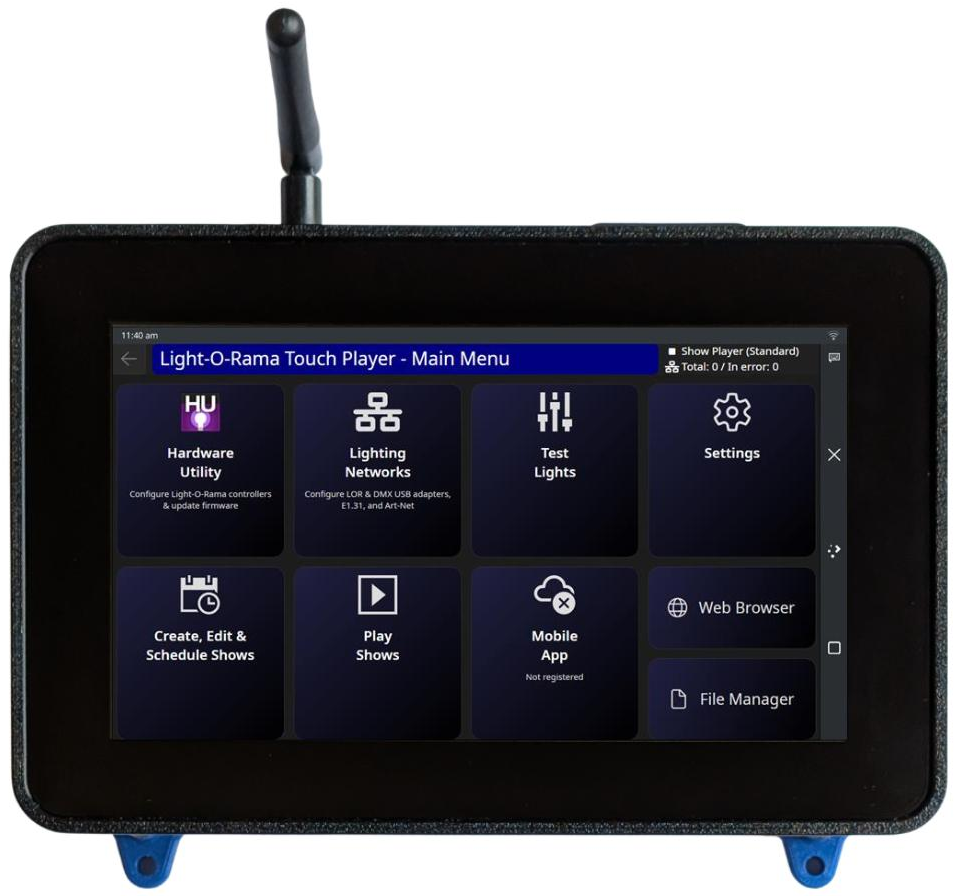
The Light-O-Rama Touch Player
Quick Start
Things you will want to do after unpacking your new Touch Player:
•Learn how to turn the system on and off.
•Learn how to use the touch screen (navigation, screen brightness, on-screen keyboard)
•Connect to Wi-Fi: do this in Settings > Networks. You might want to turn on file sharing while you are there.
•Set your time zone: do this in Settings > Date & Time
•Import a show from your computer
Introduction
The Light-O-Rama Touch Player allows a user to control their light show without a personal computer or Showtime Director. It can play shows without music, as well as shows with lights synchronized to audio or video media. Audio can be output via a 3.5mm audio jack and video can be output via a full-sized HDMI port.
Light-O-Rama and third-party controllers are supported. LOR, Enhanced LOR (ELOR), and DMX protocols are supported via 4 built-in RS-485 ports. E1.31 and Art-Net protocols are supported via the 1Gb Ethernet port. The device also supports advanced integration via its REST API and can synchronize with other Touch Players or third-party devices with its SMPTE and Art-Net time code support.
Connect the Touch Player to the Internet via the built-in Wi-Fi, enabling the device to be controlled via Light-O-Rama’s mobile app. See the Settings > Networks screen for instructions on how to connect to your local network, then go to the Mobile App screen and enter your Light-O-Rama license.
The device stores data on its internal 128GB SSD drive – enough for even the largest light shows. 4GB of RAM ensures smooth device operation. Two USB 3.0 ports allow file transfers via flash drive and for expansion. For example, you could add any LOR USB adapter, a USB sound card, a third-party DMX adapter, keyboard, mouse, or additional storage.
The device has a built-in real-time clock which will keep time even no power is applied. Time can be set manually via the touch screen or automatically via an Internet connection - see the Settings > Date & Time screen for more information. The device has a small built-in UPS (uninterruptible power supply). If power is accidentally removed, the device will shut down gracefully, ensuring your data is safe. After power is restored, pressing the power button will turn the Touch Player back on.
The Touch Player can connect to Bluetooth devices - keyboards, mice, speakers, headphones. See the Bluetooth item on the Quick Menu for information on how to enable it and pair devices.
Contents:
•Using the Touch Screen - on screen keyboards, Quick Menu
•Moving Sequences, Shows, and Other Files To The Touch Player
oGeneral - fine tune Touch Player operation, set your latitude/longitude
oDate & Time - set the date, time, and timezone
oNetworks - connect to Wi-Fi and wired Ethernet networks, enable file sharing
oIntegration - enable the REST API, OSC control, and/or Time Code synchronization
oTriggers - connect external switches or motion detectors in order to control your show
oUpdates - update the software on the Touch Player
oAbout - information about the Touch Player
Power, Start Up, & Shut Down
The Touch Player can be powered by the included 12V wall adapter or by a compatible 12V rechargeable battery pack, which is not included. To use the wall adapter, plug it into an outlet, then connect the barrel jack to the power input on the right side of the device.
When power is supplied to the Touch Player, the red status LED illuminates. When the yellow LED turns on (middle status light), press the red button on the side of the Touch Player to power on the device. The green status LED illuminates when the device is operating.
The table below summarizes the status LED states.
Off - no power |
|
Power is being supplied to the barrel jack |
|
Device is ready to turn on |
|
On - device is operating |
|



If power is lost unexpectedly, the Touch Player uses its small built-in UPS only long enough to complete a safe shutdown. The UPS does not support normal operation after external power is removed. Do not use abrupt power removal as the standard method for turning off the Touch Player.
If power is lost and then restored within 2 minutes, the Touch Player will automatically reboot. Playback will resume if a show is scheduled for that time.
Shutdown
To safely shut down the Touch Player, touch the upper-right corner of the screen and swipe down to open the Quick Menu. Select Shut Down, then confirm the Shut Down selection. Wait until the green status LED turns off before removing the power source.
You can also access the Restart button from this screen, which you would use after a system update.
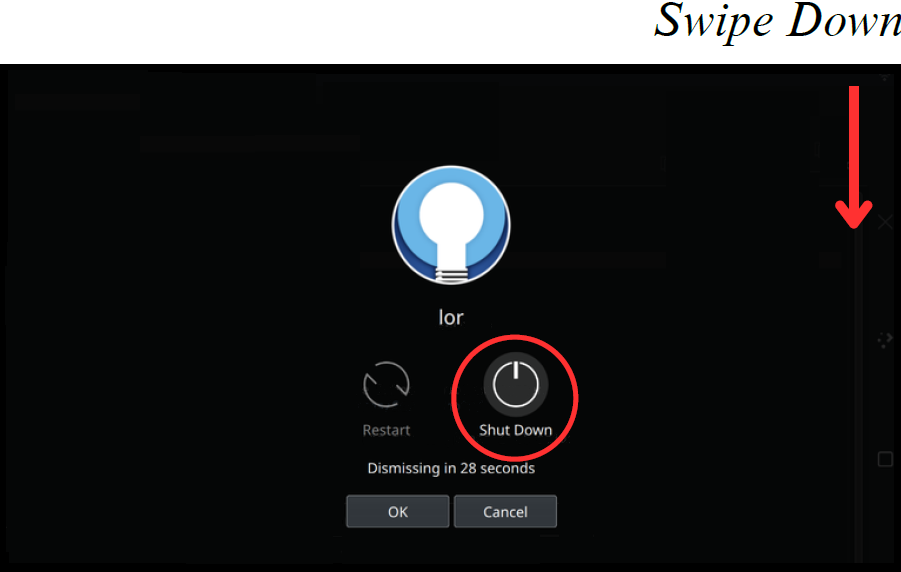
The Shutdown screen
Ports & Connections
Ports on the right side
•Power button
opressing this button when the yellow and red status lights are illuminated will start the device.
opressing this button while the display is switched off (power saving mode) will turn it back on
opressing this button while the display is on will show the shutdown screen.
•Status lights
ored (right-most) indicates power is being supplied to the barrel jack
oyellow (middle) indicates the internal UPS is fully charged.
ogreen (left-most) indicates the device is running
•Ethernet Port - used to connect to E1.31 and Art-Net lighting controllers, including the Light-O-Rama Aurora and PixieLink devices. Use a network cable (Cat 5e or 6) to connect the Touch Player to a network switch or router, and then connect your controllers to the switch or router.
•USB ports - two USB 3.0 ports allow file transfers via flash drive and for expansion. For example, you could add any LOR USB adapter, a USB sound card, a third-party DMX adapter, keyboard, mouse, or additional storage.
•HDMI - this is for displaying video media in your sequences. It can be connected to a monitor, TV, or projector via a standard HDMI cable. The output will be black until a sequence with video media is played. The device does not mirror the main display on this port.
•Power input (barrel jack) - to be connected to the included wall adapter
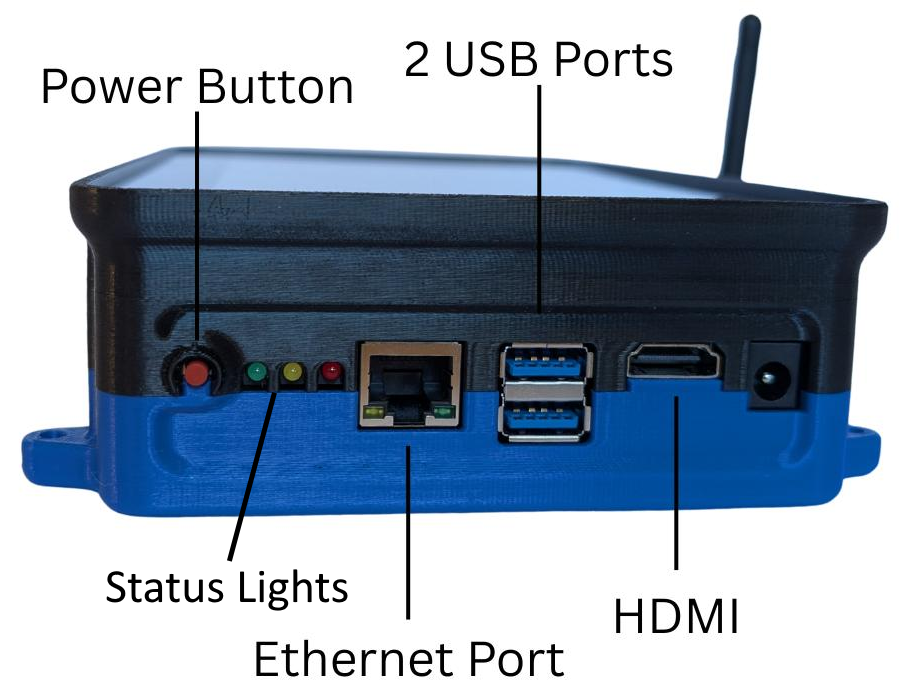
Ports on the right side
Ports on the left side
•Audio output - outputs audio for sequences with audio or video media. It is a standard 3.5mm (1/8”) stereo mini-jack that supplies line-level output. You can directly plug headphones or an FM transmitter into this jack. Use an amplifier to drive speakers.
•Trigger inputs - 10-pin header supporting 6 trigger inputs which can be used to start a show or control an interactive show. See the Settings > Triggers section for more information.
•RS-485 ports - these 4 ports can each be set to LOR, Enhanced LOR (ELOR), or DMX protocols. ELOR supports speeds up to 1000K. From the factory, all 4 ports are configured for ELOR 500K. The port closest to the audio jack is the Regular network, then Aux A, Aux B, and Aux C. Go to Lighting Networks to change the settings.
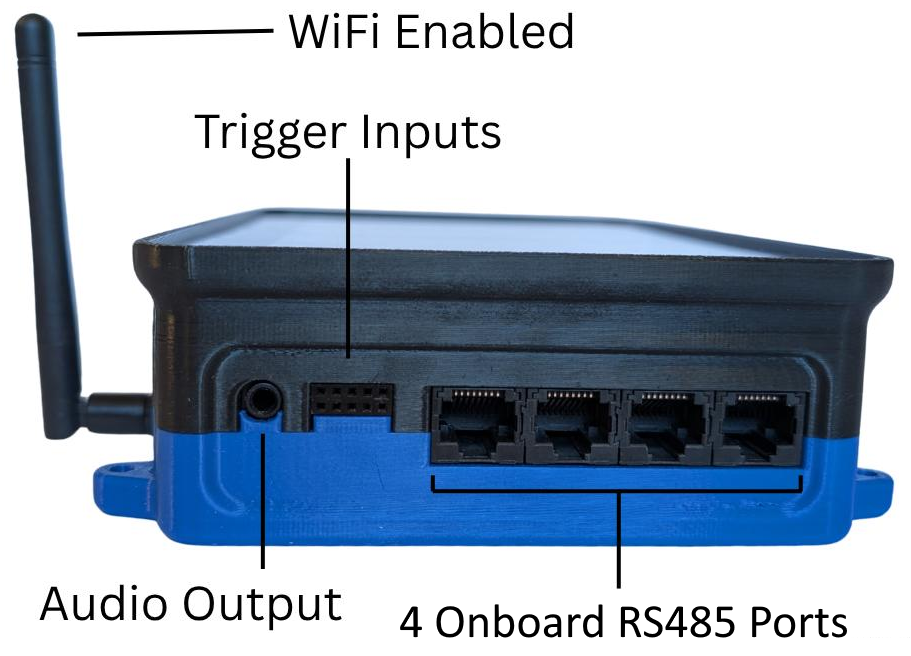
Ports on the left side
Using the Touch Screen
When interacting with the Touch Player, the experience is designed to be like a smartphone or tablet:
•All apps run full screen on the main display
•Everything in the Touch Player app works with a single tap. There are no long taps or double taps.
•At the upper left corner is the time, and at the upper right will be an icon for an Ethernet or Wi-Fi connection.
Navigation
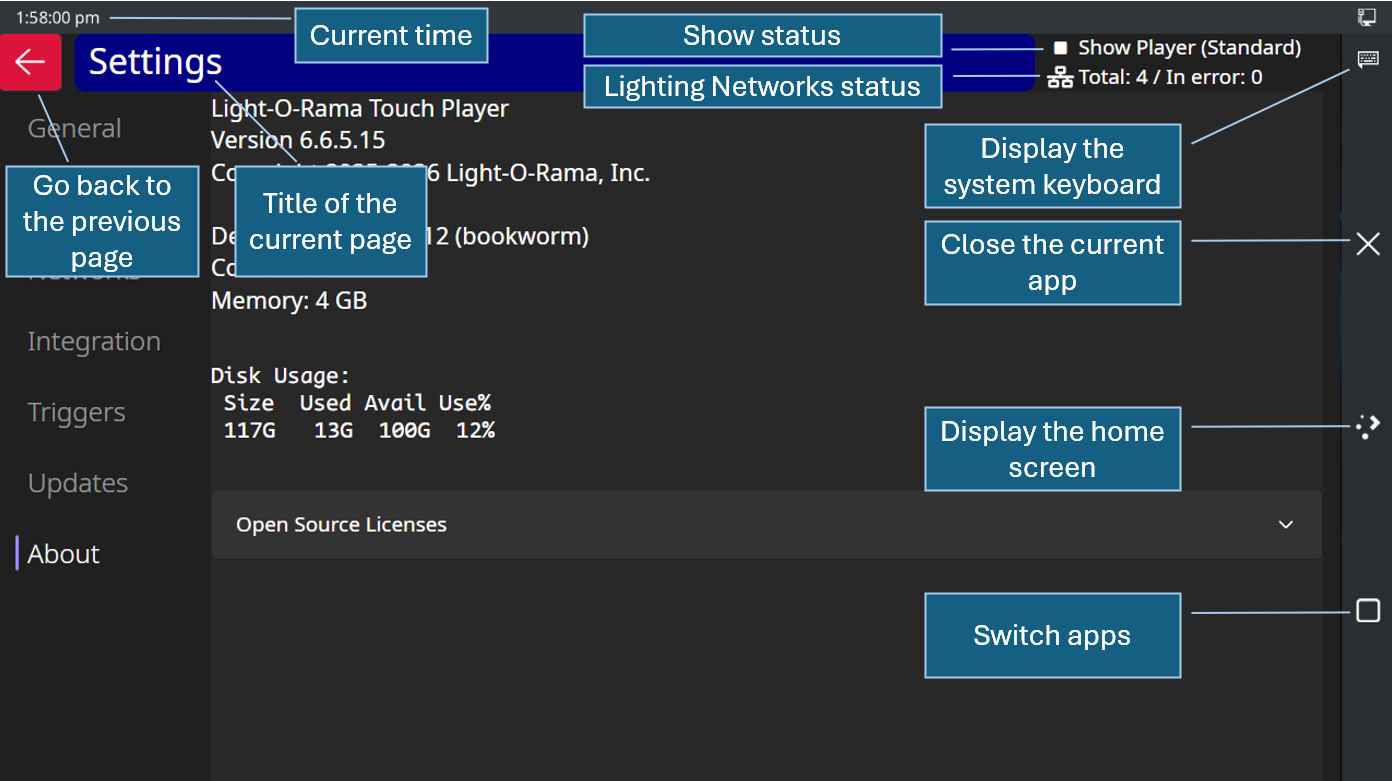
Touch Player Navigation
Navigating between apps is done with the 3 buttons on the right edge:
•Close - this closes the current app. If you accidentally close the Touch Player app, you can tap the Home button, open the app drawer, and then click the icon for the Touch Player app (blue light bulb) to reopen it.
•Home - this button displays the Home Screen (shown below). From there you can click the arrow at the bottom of the screen to open the app drawer, which displays icons for all of the installed apps (including the Touch Player app).
•Switch Apps - this allows you switch between open apps. Swipe left or right to find the desired app, then tap on it to open. Note that you can only tap on the app that is displayed in the center.
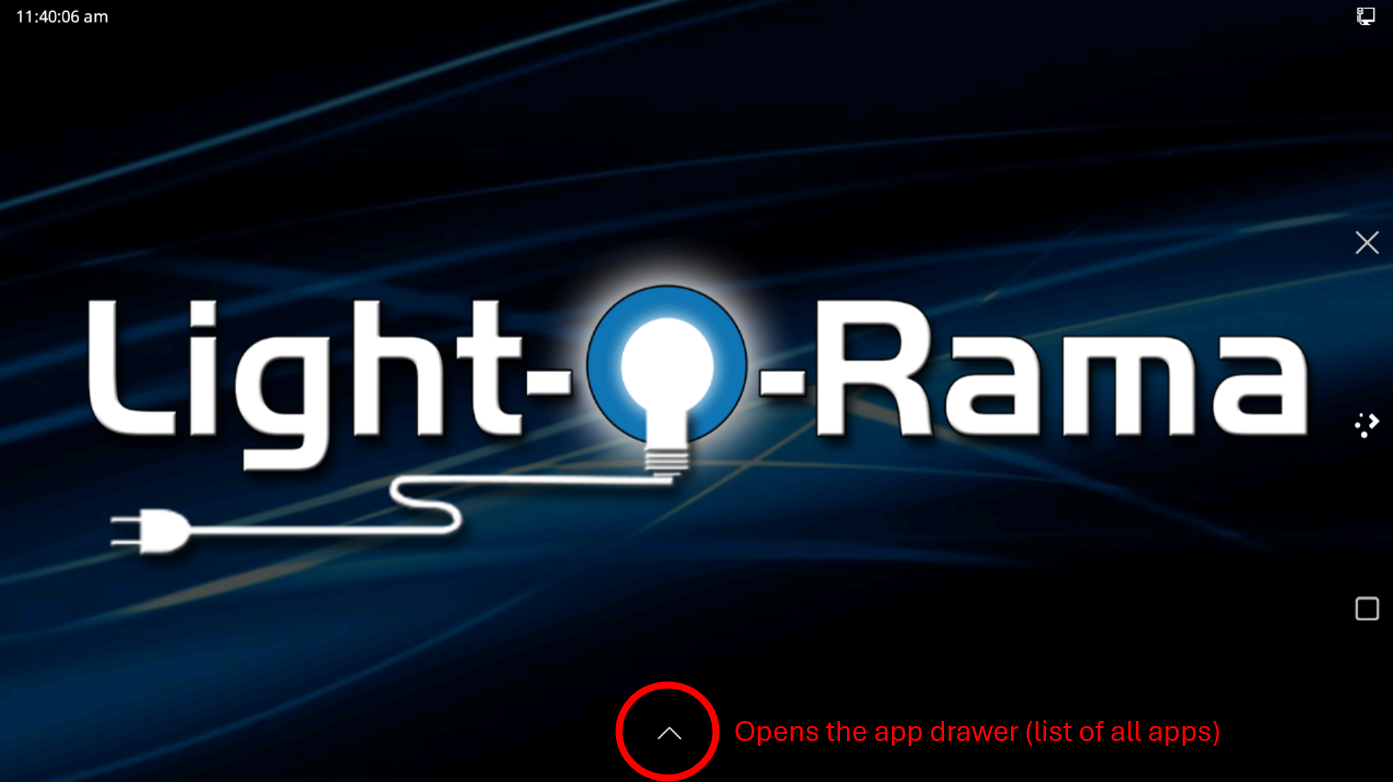
Touch Player Home Screen
Power Saving Mode
The screen will go dark after a period of inactivity to save power. All 3 status lights remain lit when the screen is in power-saving mode. As shipped from the factory:
•The screen will dim after a period of 5 minutes.
•The screen will switch off after 10 minutes.
•If the screen has dimmed, you can reactivate it by tapping once anywhere on the screen. Along the top edge is a good place to tap because the are no buttons that could be accidentally pressed.
•If the screen has switched off, you can reactivate it by:
oDouble-tapping anywhere on the screen
oPressing the power button
On-screen Keyboard
There are 2 on-screen keyboards:
•One is built into the Touch Player app. It is activated automatically whenever you click on a text field (e.g. entering an IP address). The text you enter is displayed above the blue line. After completing an entry, click the Enter key (outlined in red).
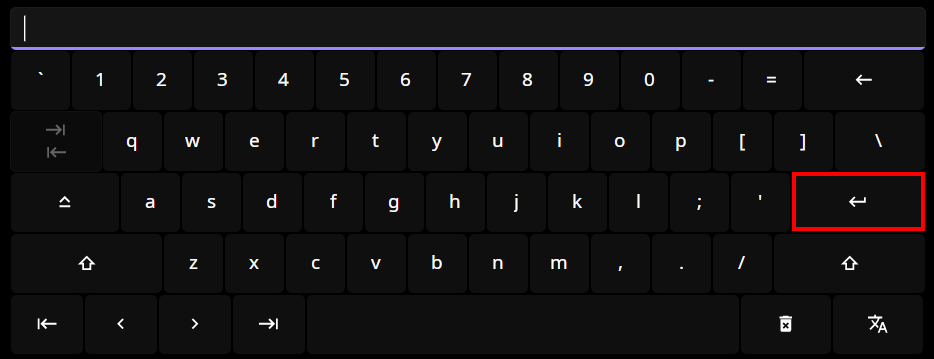
Touch Player app keyboard
•The other is the system keyboard. It is activated when you click on a text field in any other app (e.g. the web browser). When the system keyboard is displayed, the Home button will change to a down arrow. You can hide the keyboard by clicking the down arrow.
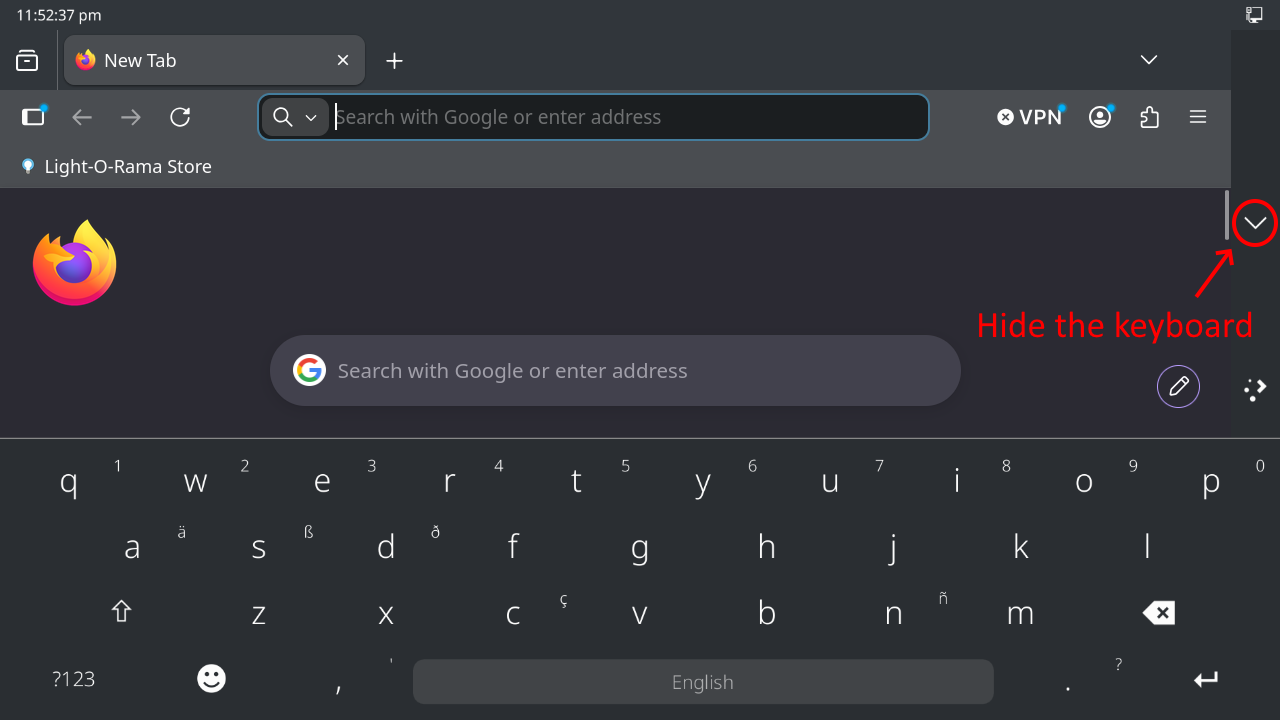
System keyboard shown with the Firefox web browser
Quick Menu
Swiping down from the top right corner of the screen will activate the Quick menu. The buttons on this menu work as follows:
•Wi-Fi - Tapping this toggle turns your wireless connection on or off. Long-pressing the icon opens the full network settings to connect to a new access point; although using Settings > Networks to set up your Wi-Fi connection is easier (and preferred).
•Bluetooth - Enables or disables Bluetooth for accessories. Long-pressing opens the Bluetooth menu to manage paired devices.
•Settings - Opens the Settings app.
•Sound - Displays a slider to adjust system volume. You can also adjust the volume of notification sounds from here.
•Airplane Mode - Disables all radios (Wi-Fi and Bluetooth) simultaneously.
•Record Screen - Select once to start screen recording, then select it again to stop recording and save it to a file in /Videos.
•Screenshot - Closes the Quick Menu, waits about half a second, then saves a screenshot to /Pictures/Screenshots. If file sharing is enabled, this folder is included in the “lorshare” network share, making the files easy to retrieve from your PC.
•Night Color - Instantly shifts the screen's color temperature to a warmer hue to reduce blue light glare. It is used to minimize eye strain when looking at your device in the dark.
•Caffeine - Temporarily suspends the system's automatic sleep timer. Tapping this forces the screen and device to stay awake indefinitely, which is helpful when reading an article or watching content without touching the screen.
•Virtual Keyboard - Enables or disables the system's virtual keyboard. It has no effect on the virtual keyboard built into the Touch Player app.
•Shut Down - Displays the Shutdown screen where you can choose to restart or shutdown your device.
•Do Not Disturb - Silences all notifications.
At the bottom of the menu is a slider that adjusts screen brightness.
Notifications are displayed to the left of the Quick Menu. For example, you will get a notification here after taking a screenshot or screen recording. These notifications are useful as they tell you where the file was stored. You can discard a notification by swiping left.
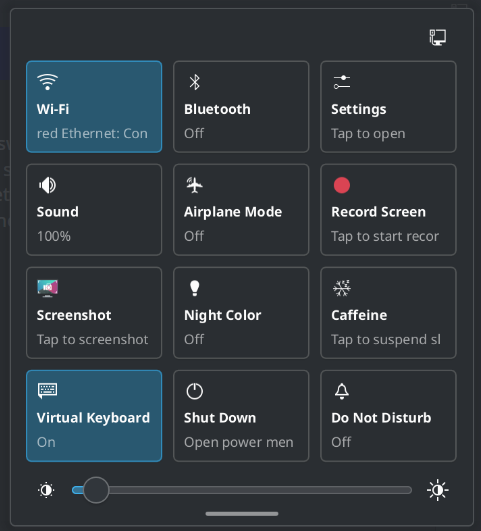
Quick Menu
Numeric Entry

When entering a numeric value into a box that looks like this, tap the up and down arrows to change the value. If you need to go a long way, you can long-press the arrows and it will auto-repeat. If you're using a keyboard/mouse, you can highlight the number, backspace to clear the value, then type in a new number.
Moving Sequences, Shows, and Other Files To The Touch Player
Packaged shows (.lsspkg files) are the best way to move a show to the Touch Player. Once the package file is created, it can be transferred via a USB flash drive or the File Share feature.
•On your computer (with LOR software installed), create a show in the Control Panel.
•Export the show as a packaged show.
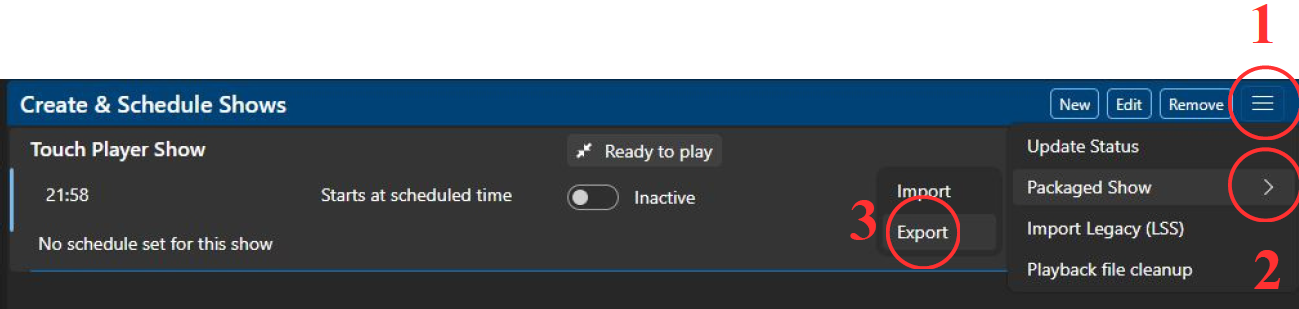
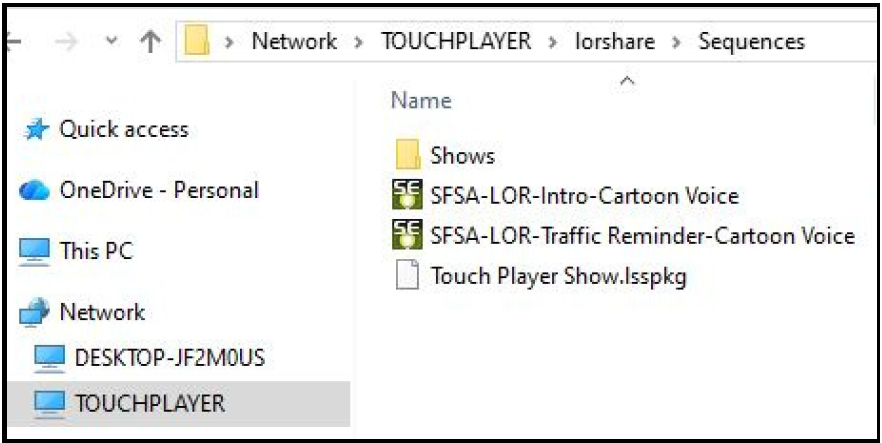
•On your computer, connect to the same Wi-Fi network as the Touch Player, then open your file explorer. Follow the steps in the File Share section to connect to the Touch Player.
•The lorshare folder contains the standard folders in the LOR Directory. Copy & Paste any packaged .lss shows to the “Sequences” folder. Copy & Paste any individual sequences and audio files to the respective Sequences and Audio folders.
•On your Touch Player, navigate to “Create, Edit, & Schedule Shows.” Select “Import” to import a packaged show, or create a “New” show with any individually transferred sequence files (with matching audio). Tap the pencil icon to make edits (if necessary) before prepping the show.
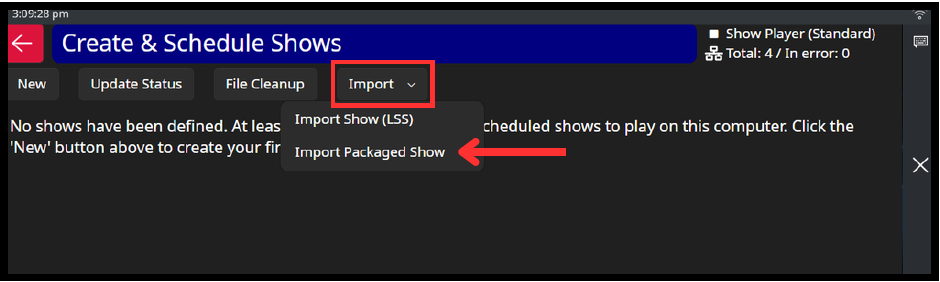
•If the show contains a set schedule and is active, it will appear as an Upcoming Show in the “Play Shows” menu of the Touch Player. It can also be played “On Demand.”
The Main Menu
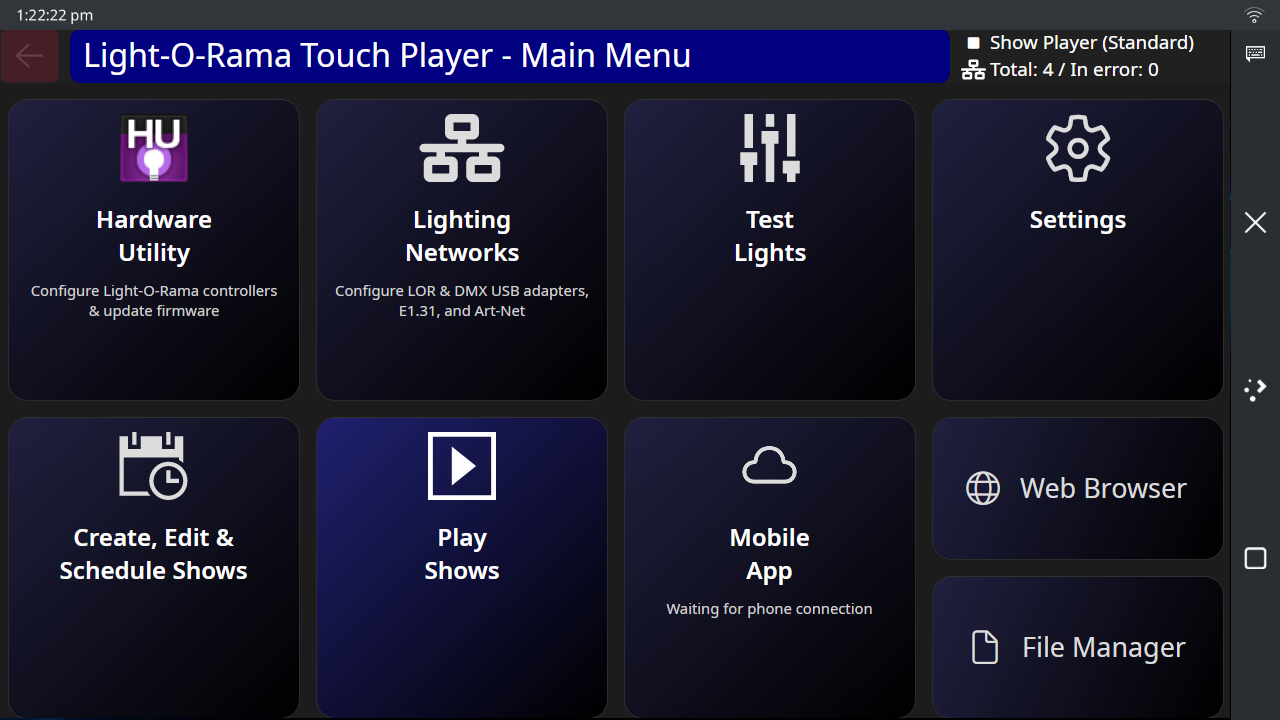
Main Menu
Touch Player menu items perform similar functions as the computer version of the Control Panel program.
Touch any button on the Touch Player menu to enter the respective sub menu. Use the red arrow in the upper left to return to the previous screen.
Hardware Utility
Use the Hardware Utility to configure Light-O-Rama controllers that run on LOR or ELOR networks. You can scan for controllers, change Unit IDs, update firmware, and configuration settings. For details, see the Hardware Utility section of the Control Panel.
Lighting Networks
•Configure LOR & DMX USB Adapters
•Scan for and configure E1.31 and Art-Net Controllers
•For details, see the Lighting Networks section.
Test Lights
•Test connected lights by Unit ID, Universe, or Channel
•Test by preview after transferring an .lorprev or previews.xml file
•For details, see the Test Lights section of Control Panel help.
Settings
•General - fine tune Touch Player operation, set your latitude/longitude
•Date & Time - set the date, time, and timezone
•Networks - connect to Wi-Fi and wired Ethernet networks, enable file sharing
•Integration - enable the REST API, OSC control, and/or Time Code synchronization
•Triggers - connect external switches or motion detectors in order to control your show
•Updates - update the software on the Touch Player
•About - information about the Touch Player
Create, Edit & Schedule Shows
•Create or Edit a show using sequences loaded onto the Touch Player
•Import a packaged LOR show
•For details, see the Create Shows section of Control Panel help.
Play Shows
•Start an On Demand Show, or view a currently playing schedule
•For details, see the Play Shows section of Control Panel help.
Mobile App
•Enable Mobile App connectivity using your license key
•For details, see the Mobile App section.
Web Browser
•Access the web to configure an E1.31 device
File Manager
•Access the LOR Directory on the Touch Player. Useful for copying files to the device using a flash drive.
Specifications
•FCC Certified
•Power input: 12VDC, 3 amps, barrel jack (can accept 9-24VDC)
•Processor: Broadcom BCM2712, quad core Cortex-A76 @ 2.4GHz
•Display: 7-inch color, 720 × 1280 pixels, capacitive touch
•Storage: user replaceable NVMe SSD, gen 2, 1 lane, 128 GB, 2230 or 2242 size
•Memory: 4GB LPDDR4-4267 SDRAM
•Wireless:
o2.4 GHz, 5.0 GHz IEEE 802.11 b/g/n/ac wireless
oBluetooth 5.0, BLE
oExternal antenna
•2 × USB 3.0 ports, supporting simultaneous 5Gbps operation. Max current: 1.8 A at 5 V (900 mA per port).
•Gigabit Ethernet RJ45
•4 × RS485 ports on RJ45 jacks using LOR pinout. 1000K max speed
•Audio: stereo 3.5mm jack
•Full size HDMI 2.0 port (supports up to 4Kp60)
•Built-in real-time clock which keeps time even when no power is applied.
•10-pin header supporting 6 trigger inputs. Pin-out compatible with LOR N4G4 director.
•Fan: 30mm x 30mm x 7.5mm, variable speed, Max RPM: 10,000
•3 LED indicators for power status
•30 second UPS power supply enables safe shutdown on power loss
•Operating Range: -20 C to +40 C
•Size: 197x148x49 mm (excluding external antenna)
•Net Wt. 22 oz (635 g)
Open Source Notice
The Touch Player's operating system is built on Raspberry Pi OS and KDE Plasma Mobile, both open-source projects. In keeping with their GPL/LGPL licenses, we've published the source code for any modifications we've made: https://github.com/Lightorama/LOR-Touch-Player. The Light-O-Rama playback software itself is proprietary and is not covered by this license.