The item list appears to the left of the sequence grid.

Areas within the Sequence Tab
Subjects covered in this topic:
Item List Hierarchy
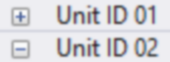
The item list is a hierarchical tree where items in the list can have child items, and those children can in turn have children. Items in the hierarchy with child items below them will be displayed with a "+" or "-" symbol inside a small box to the left of the name:
•a "+" symbol means the children are hidden; clicking on the "+" will expand the tree node and display the children
•a "-" symbol means the children are displayed; clicking on the "-" will collapse the tree node and hide the children.
•You can right-click on a collapsed item (one with a "+" button next to it) and select "Expand" from the pop-up menu to display all children at all levels below the item that was clicked.
•You can right-click on an expanded item (one with a "-" button next to it) and select "Collapse" from the pop-up menu to hide all children at all levels below the item that was clicked.
•You can select Expand All from the Grid View Menu to display all children for every item in the Item List.
•You can select Collapse All from the Grid View Menu to hide all children for every item in the Item List.
Preview Props
Preview props that have a single regular channel, RGB channel, or motion effect row will be displayed as a single row in the sequence grid.
A prop with a single string of lights (such as a bush):
![]()
An RGB flood light:
![]()
A pixel-based arch with 1 motion effect row and the channel level disabled (motion effect rows require a Pro license):
![]()
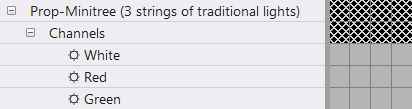
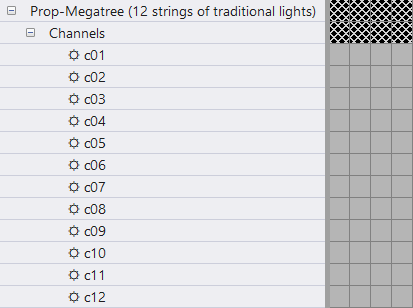
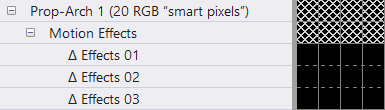
Preview props that have more than one regular channel, RGB channel, or motion effect row will be displayed as a tree in the item list. The examples below are shown with Condensed Mode off.
A mini-tree with multiple strings of lights, and each string color is assigned to a separate channel:
A megatree built with strings of traditional lights (c01 is the first string, c02 the second, etc):
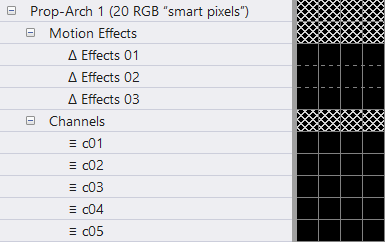
A pixel-based arch with 3 motion effect rows and the channel level disabled (motion effect rows require a Pro license):
Preview Groups
Preview groups can generate a hierarchy because they can have motion effect rows (if the group's arrangement setting is not "none"). Members of the group (props and/or other groups) are also listed under the group.
Note: motion effects on groups allow you to do some amazing things, like color sweeps across several props or even your entire display.
As an example, here are 3 pixel arches combined into a group.

Group Definition
The first motion effects row is for the group - effects created here will act as if the combined arches are one big prop. This is followed by motion effect rows for each individual prop.
Group displayed in the sequence grid
Grid View Groups
A grid view group is a set of regular channels or RGB channels or Motion Effect rows or beat channels (or, conceivably, other grid view groups) that is nested together, so that it can be collapsed down to a single row in the sequence grid, or expanded to show all of its members.
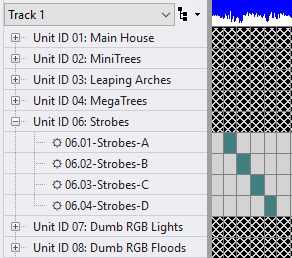
In this example, the grid view group "Unit ID 06: Strobes" has been expanded. The other grid view groups are collapsed.
RGB Aggregates
RGB aggregates have 3 channels that are displayed as children in the hierarchy.

"Hoop 2" is an RGB Aggregate
RGB Channels on Pixel Props
If you have a Pro license, pixel-based props are displayed with motion effect rows by default. You can display the RGB channels by right-clicking on the prop name and selecting "Enable Channel Level on Pixel Prop" on the pop-up menu. Later, if you decide that you no longer need the channel level, you can right-click on the prop name and select "Remove Channel Level on Pixel Prop". If you don't have a Pro license, then RGB channels are always displayed (motion effect rows are not available at these license levels).
As an example, here is a pixel-based arch with the channel level enabled (only the first 5 RGB channels are included in the picture). With these settings, the prop can be sequenced using motion effects and channel effects interchangeably. Channel names use a "Rxx Cyy" notation, where xx is the row number and yy is the column number. If the prop only has 1 row, the row number is omitted. If the prop only has 1 column, the column number is omitted You can find out which pixel is which by setting Pixel labeling to "Row / Column" in Preview Design and then selecting the prop in question. The row and column numbers shown in the channel description also correspond to the rows and columns shown in the Layout View.
Condensed Mode
The item list hierarchy can be displayed such that all levels of the tree are displayed, or a "condensed" mode where higher levels of the tree are hidden when lower levels are displayed.
Turning condensed mode off makes it easier to understand the item list hierarchy, but it leaves "blank" rows (the ones with X's) in the sequence grid.

Condensed Mode OFF
Turning condensed mode on mimics the behavior of the S4 Sequence Editor, and uses the screen space more efficiently. This is the same example as above; however, with condensed mode enabled, the "Roofline ALL", "Motion Effects", and "Member Props" items have been hidden because their children are visible.

Condensed Mode ON
You can turn condensed mode on or off via the Grid View Menu.
Item List Double-Click

Double-clicking on an item name brings up the Prop Definition or Group Definition or Beat Channel Definition, depending on the type of item that was clicked. If a prop or group definition is modified in this way, the sequence grid will be updated to reflect the changes and the preview will be saved to disk.
Reordering The Item List

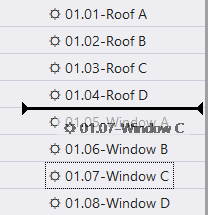
You can reorder the list by clicking and dragging items. In the picture below, "01.07-Window C" is being dragged to a new position. You can also use this technique to move items in and out of grid view groups.
You cannot change the order of motion rows. Their order is set in the Motion Effect Rows Dialog.
Other ways of reordering the item list include:
•Right-clicking on a channel name and selecting "Sort Channels" from the pop-up menu.
•Selecting Sort Item List from the Grid View Menu.
Item List Right-Click Menu
Right-clicking on an item name brings up a context menu of actions you can take with that item. The content of the menu is highly dependent on the type of item that was clicked.
Menus for regular channels, RGB channels, motion effect rows, and preview groups

Menu for a regular channel or RGB channel in the "Show All Items" grid view

Menu for a regular channel or RGB channel in a user grid view

Menu for a motion effect row

Menu for a preview group

Menu for a grid view group
As you can see from the examples above, not all menu items are available in every situation. However, here is a compilation of the menu items you will encounter:
•Prop Definition - opens the Prop Definition window for the prop
•Group Definition - opens the Group Definition window for the group
•Use This Prop (or Group) in the Effect Samples Window - by default, effect samples displayed in the Effect Samples Window use a 50 by 50 matrix. However, with this command you can have the samples generated using the selected prop or group.
•Expand - expands all levels of the selected prop or group, such that all child items are displayed.
•Collapse - collapses all levels of the selected prop or group, such that all child items are hidden.
•Insert Preview Props and Groups - adds additional props or groups to the current grid view via the Insert Props And Groups Dialog. This menu item is for user grid views only (not the "Show All Items" grid view).
•Convert to Grid View Group - opens a dialog that allows you to move the clicked item, and optionally those below it, into a new grid view group.
•Duplicate Children to New Group - allows you to copy the children of the current grid view group into a new group.
•Degroup - removes the selected grid view group, but leaves the members of the group in its place.
•Change Grid View Group Name - allows you to change the name of the selected grid view group.
•Remove Item from This Grid View - removes the selected item for the current grid view. The item is not deleted, it is simply no longer visible in the current view. This menu item is for user grid views only (not the "Show All Items" grid view).
•Copy Item to Another Grid View - opens a dialog that allows you to make the selected item visible in another grid view (an existing grid view or a new one).
•Hide group members - by default, when you include a preview group in a grid view, you will see "member props" and/or "member groups" nodes below the group node. Use this menu option to hide those "member" nodes. This can be useful If you are at the Pro license level and using motion effects to sequence the preview group - you may not want to see the members of the group.
•Sort Channels - Sort all of the channels on the same hierarchy level by name, channel color, row number within the prop layout, column number within the prop layout, physical channel settings, or reverse the current order.
•Set Channel Name - sets the channel name. This menu item is only available on props with multiple strings (e.g. megatrees).
•Manage Motion Effect Rows - allows you to add new motion effect rows and/or modify existing ones via the Motion Effect Rows Dialog.
•Add Motion Effect Row - adds a new motion effect row.
•Subdivide into Sections - opens the Subdivide dialog.
•Delete Motion Effect Row - if the row contains 1 or more effects, a confirmation message is displayed before removal. If there are no effects on the row, it is removed without confirmation. If you need to delete multiple rows, see the Sequence > Motion Row Cleanup option on the main menu.
•Enable Channel Level on Pixel Prop - enables channel level sequencing on pixel-based props. If the channel level has already been enabled, this entry will be "Remove Channel Level on Pixel Prop" - which will remove the RGB channels and allow motion effects sequencing only.
Menu for a beat channel
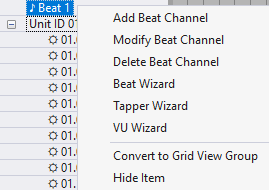
Options on this menu include:
•Add Beat Channel - opens a dialog that allows you to add a new beat channel to the sequence.
•Modify Beat Channel - open a dialog that allows you to change the name and/or color for the selected beat channel.
•Delete Beat Channel - displays a confirmation message, and then deletes the selected beat channel.
•Beat Wizard - opens the Beat Wizard.
•Tapper Wizard - opens the Tapper Wizard.
•VU Wizard - opens the VU Wizard.
Menu for a loop row

Menu when right-cliicking on a loop name
These items are described in the Loops in Animation Sequences topic.
X-ed Out Rows
If a row is displayed with an "X" pattern, it is a placeholder in the item list and cannot have effects applied to it. This most often occurs when Condensed Mode is off -- the placeholder rows can be hidden by turning Condensed Mode on.
A placeholder row