This dialog window can be opened from 3 places:
1.When clicking on the "Default Motion Rows" button in Prop Definition, you can add, modify, or delete default motion effect rows for the prop.
![]()
Default motion rows will be automatically incorporated into new and existing sequences which use that preview. Any changes to the default motion rows will be automatically applied to the affected sequences. This makes them very useful for creating a consistent set of motion rows across your sequences.
Default motion rows are displayed with an icon that has a triangle with a bar underneath:
![]()
2.When clicking on the "Default Motion Rows" button in Group Definition, you can add, modify, or delete default motion effect rows for the group. These work in the same way as default motion rows for a prop.
3.When right-clicking on a prop or motion effect row in a sequence's Item List and selecting "Manage Motion Effect Rows" from the pop-up menu, you can add, modify, or delete sequence motion effect rows. As the name implies, sequence motion rows are specific to the sequence they are in -- adding a sequence motion row (or changing one) does not affect any other sequence. When opening the dialog from "Manage Motion Effect Rows", a mix of default and sequence motion rows may be displayed; however, you will only be able to modify the sequence motion rows. Editing the defaults requires using #1 or #2 listed above.

Sequence grid right-click menu
Sequence motion rows are displayed with a triangle icon:
![]()
Motion effect rows do not have to apply to all of the pixels in a prop (or group). Using this dialog, you can specify that a motion effect row applies to:
•all of the pixels in a prop or group (subsection=none)
•a rectangular subsection of the prop's pixels (subsection=rectangle). For example, you could divide a pixel tree into tiers.
•a custom set of pixels chosen by you (subsection=custom). For example, you could draw a face.
When motion effect rows are displayed in a sequence's Item List, the row name is displayed with a square icon suffix to indicate those rows apply to a subsection of the prop or group. Rows with subsection=none are displayed without the suffix, indicating they apply to the entire prop or group.

Motion effect rows in a sequence
In the window, the current set of motion effect rows are listed in the table on the left, and the prop's pixels are shown on the right. If you click on a row in the table on the left, then the pixels used by that entry will be graphically represented on the right.
Within this dialog you can:
•Manually Specify a Rectangular Subsection
•Set the Motion Row Combination Mode
•Copy/Paste the Motion Row Configuration

The Motion Effect Rows Dialog
The left side identifies background (Back) to foreground (Front) rows. You can choose whether the background layer is listed first or last on the Sequencer Preference's Motion Effects tab.
Add A New Row
Clicking the "Add" button will add a new motion effect row to the table. The new row will use all of the pixels in the prop or group (the Subsection field will be set to "none").
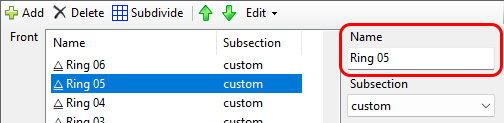
Change Row Name
By default, motion effect rows are named "Effects 01", "Effects 02", etc. You can change the name using the Name field to the right of the motion row list.
Change Row Type
You can change the section type using the Subsection drop-down in the center section.

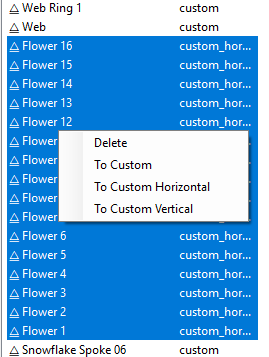
You can also change multiple motion effect rows at once, by using Ctrl-click and Shift-click to select the desired rows, then right-clicking and the choosing the desired type from the pop-up menu.
Add Rows By Subdividing
Using the "Subdivide" button, you can divide the pixels into rows and columns, creating a separate motion effect row for each section.
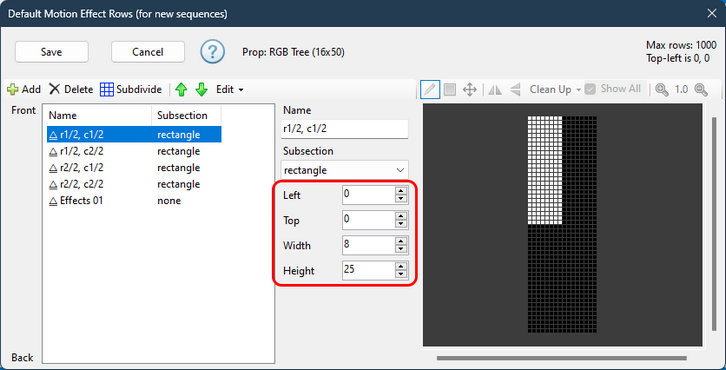
The following picture shows a 16x50 pixel tree subdivided into 2 columns and 2 rows. There will be 4 new motion effect rows created, with each subsection being 8x25 pixels
Note that the new motion row names are listed on the right. You can modify those names by changing the fields on the left:
•Base name - controls the beginning of the name
•Row prefix - controls how rows are identified. Try "r" if you like short names, or "row" if you prefer longer names.
•Column prefix - controls how columns are identified. Try "c" if you like short names, or "col" if you prefer longer names.
•Suffix - controls whether a suffix is added that reflects the total number of rows and/or columns being created. This is important if you subdivide a prop multiple times - for example into 2 rows, 4 rows, and 8 rows. Adding a suffix will allow you to identify which motion rows belong to which group.

Subdividing a pixel tree into 2 columns and 2 rows
The next picture shows the result after clicking "OK" in the Create Subsections dialog.
•The "r" in the name stands for "row" and the "c" stands for "column".
•The new rows are added as foreground layers. The original row remains as the background.
•Clicking on a row in the table graphically displays the subsection on the right.

Result of subdividing the pixel tree into 4 sections
Manually Specify a Rectangular Subsection
While the "Subdivide" button is very convenient for creating equally sized subsections, you might have need to manually specify a subsection. You can do this by making sure the "Subsection" drop-down is set to "rectangle" for the motion effect row, and then manually typing the values for left, top, width, and height.
Creating a Custom Subsection
Custom subsections allow you to do things like define singing faces on a pixel matrix or pixel tree. You can also use it to define sections of a pixel-based custom shape -- for example arms of a snowflake. In the picture below, we've defined a new motion row called "Edge" that just contains pixels on the outer edge of the prop.

Defining a custom set of pixels to be controlled by the motion effect row
Creating the "Edge" custom section
1.Click the "+ Add" button to add a new row. The new row will be selected and the "Name" and "Subsection" fields will be displayed to the right of the motion row list.
2.In the "Name" box, change the entry to "Edge". Notice that as you type, the name in the motion row list changes immediately.
3.Change the Subsection drop-down to "custom". Once that is done, the Custom Subsection Toolbar on the right side will be enabled.
4.Click the pencil icon on the Custom Subsection Toolbar to enter freehand drawing mode.
5.Move your cursor over the black squares. Press and hold the left mouse button. As you drag across the black squares they will turn white, indicating they are now part of the custom subsection. Select the pixels on the edge as shown in the screen shot above.
6.If you select some wrong pixels by mistake:
a.Release the mouse button
b.Hold down the Shift key on your keyboard (either the left or right Shift key is OK). The cursor will change to the "erase" cursor.
c.Click on a white pixel you wish to remove from the custom subsection. You can hold the left mouse button down and drag across the region to erase multiple pixels if needed.
7.Repeat steps 6 and 7 until you have created the desired pattern of pixels.
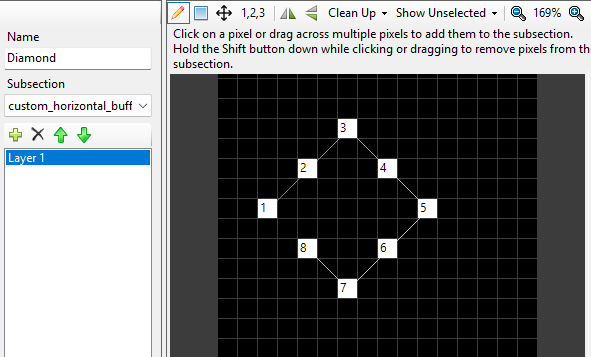
Creating "custom horizontal buffer" & "custom vertical buffer" sections
These subsection types are defined in the same way as a custom subsection -- the only difference is the option you pick in the Subsection drop-down box.
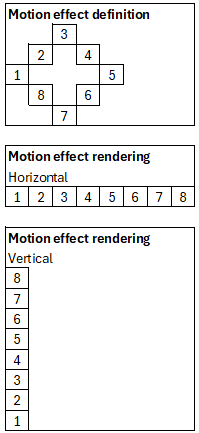
While they are defined using the same methods, they render differently.
•A Custom subsection is rendered in the same configuration as you see on the screen (think of it like a group with a Preview arrangement).
•A Custom Horizontal Buffer is rendered as a single row of pixels, so motion effects that move left or right travel along your subsection, even if the subsection itself is not straight.
•A Custom Vertical Buffer is rendered as a single column of pixels, so motion effects that move up or down travel along your subsection, even if the subsection itself is not straight.
For example, if we define a subsection in the shape of a small diamond, this shows the resulting render buffers:
The order of the pixels is very import in these 2 modes.
•In general, the order will be the order that you clicked in the grid. However, you can change the order using the toolbar's renumber tool.
•If you zoom in far enough, the pixels will be labeled so you verify the order.
•All pixels will be connected with a line that starts blue and fades to green so you can see the order -- even if you are not zoomed in enough to see the numbers.
It is possible to define more that than one row/column for these sections. To do that, use the layer list that appears below the Name and Subsection fields. Click the "+" button to add a new layer, "X" to delete a the selected layer, and the up/down arrows to reorder the layers. If there are multiple layers defined, the motion row is rendered as a matrix with the layers becoming rows/columns.
Changing Pixel Order (Renumber tool)
Click the button on the toolbar labeled "1,2,3" to switch to renumber mode. This mode is only available in "custom horizontal buffer" and "custom vertical buffer" sections. In the renumber mode you can:
1.Drag your cursor over the pixels in the section. The first pixel you drag over becomes the new number 1, the next pixel becomes number 2, etc.
2.If you hold the Shift key down while dragging, renumbering will start where you left off. For example, if you drag over the first 5 pixels in the subsection without the Shift key, when you next drag with the Shift key pressed, the first pixel crossed will become pixel number 6. This allows you to renumber a large subsection in sections.
3.If you hold the Ctrl key down and click on a pixel, the general order of pixels will be maintained, but the pixel you clicked will become the new number 1. This can be helpful on a motion row that forms a circle or other closed figure. Making the starting location of all such closed figures consistent can improve the look of the motion effects that they display.
The blue connections will change dynamically as you renumber the pixels. This gives you visual feedback on how the renumber process is progressing.
Note that it is not possible to add or remove pixels while renumbering. You will need to switch to the pencil tool for that.
Here is an example where the lines clearly show the pixels are not in order and some time with the renumbering tool is needed:

Renumbering needed
The Custom Subsection Toolbar
•Use the "Pencil" tool to turn pixels on (make them part of the subsection) as you drag the cursor. Left-click on a pixel in the diagram to turn a single pixel on, or drag across the diagram with the left mouse button depressed to select multiple pixels at a time. Hold the Shift button down while performing the same actions to turn pixels off (remove them from the subsection).
•Use the "Rectangle" tool to turn on a rectangular section pixels (make them part of the subsection). Press the left mouse button to start the selection, then drag to the other corner of the selection. When you release the mouse button, all of the pixels within that area will be selected. Hold the Shift button down while performing the same actions to turn pixels off.
•Use the "Move" tool to reposition the selected (on) pixels.
•Use the Renumber tool (1,2,3) to change the order of pixels in "custom horizontal buffer" and "custom vertical buffer" sections.
•Use the "Flip Horizontal" tool to reverse the enabled pixels left to right.
•Use the "Flip Vertical" tool to reverse the enabled pixels top to bottom.
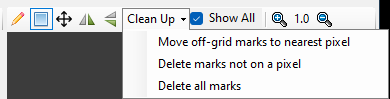
•After creating a custom subsection in Manage Motion Effect Rows for a prop with a custom shape and then subsequently changing the custom layout, it is possible to end up with nodes in the custom subsection that are no longer on a pixel.
oUse the "Move off-grid marks to nearest pixel" menu item to move all off-pixel nodes onto a pixel.
oUse the "Delete marks not on a pixel" menu item to clean up such nodes.
oUse the "Delete all marks" menu item to turn off all of the pixels. This is useful if you want to start over with your custom selection.
oUse the "Reverse" menu item to reverse the order of pixels on the selected layers of horizontal or vertical row types. If you are editing a motion row with multiple layers, make sure to select the desired layers first.
•Use the "Show All" check box to show all of the motion effect rows with a "custom" subsection on the diagram at the same time. For example, if you are drawing a face on a pixel matrix, you might first draw the outline of the head on one motion effect row. Then you might draw the eyes on another row. While drawing the eyes, it is useful to see where the outline of the head is, so you would keep "Show All" enabled.
•Depending on the size of the prop and the size of your computer display, the individual pixels may be very small and difficult to select. Click the magnifying class icons to zoom in or out if needed. The number between the 2 icons is the zoom level.
Scrolling & Zooming
You can use the scroll bars to to scroll vertically and horizontally and the zoom control on the toolbar to zoom in and out. In addition, you can use your mouse wheel to perform these operations:
|
Use the mouse wheel to scroll vertically.. |
||
|
Hold the shift key down while using the mouse wheel to scroll horizontally.
Some mice allow you to tilt the mouse wheel left and right. This will also scroll left and right. |
||
|
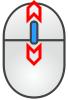
Hold the Ctrl key down while using the mouse wheel to zoom in and out |
Motion Row Combination Mode
When this dialog is opened from the sequence grid using the "Add/Modify motion effect rows" right-click menu item, an extra drop-down box is displayed in the middle of the toolbar. When a prop or group has more than one motion effect row, this setting controls how the rows are combined.

Motion Row Combination Mode
Blend Mode
In Blend mode, the maximum brightness for each pixel is taken from the effects across all motion rows. This mode is backward compatible with prior versions, including the S4 Pixel Editor. The order of motion rows does not matter in this mode.
In the following example, the tree is on the first motion row, Santa is on the second motion row, and a Marquee effect is on the third motion row. Notice that Santa's left arm gets lost in the tree, and the tree mixes with the marquee effect at the bottom. For this reason, Blend mode is not recommended for new sequences -- use Overlay mode instead.

Blend mode
Overlay Mode
In Overlay mode, motion rows are overlaid one on top of the other using alpha blending (i.e. effects can have areas that are transparent). The background row is applied first, then successive rows are layered on top of it. The foreground layer is applied last. Note that you can use the up and down arrows on the toolbar to change the order of the rows, thus changing the order in which rows get overlaid. Overlay mode is the default for new sequences.
Using the exact same sequence as the Blend mode example, you can see that Overlay mode produces a much better result -- the tree is in the background, Santa is in front of the tree, and the marquee is in the foreground.
In the dialog, the background and foreground rows are labeled on the left side: "back" and "front". You can choose whether the background layer is listed first or last on the Sequencer Preference's Motion Effects tab.

Overlay mode
Edit Menu

The Edit Menu
Create Combined Row
Use this menu item to create a new motion row that contains all of the selected pixels from 2 or more motion rows that contain subsections. These motion rows could contain custom subsections or rectangular subsections or a combination of both. It will give an error if you try to include a motion row where the subsection is set to "none". Select the motion rows you want to combine first, then select Edit > Create Combined Row. You will be prompted for the name of the new row.
In this example, we will create a new motion that is the combination of several motion rows we created above.
•First, click on the "Edge" row, then Ctrl-click on the "Effects r1/2, c1/2" row, then Ctrl-click on the "Effects r2/2, c2/2" row.
•Select Edit > Create Combined Row
•Give the new row a name when prompted. Here we used "Edge+Upper Left+Lower Right"

3 rows selected
•And here is the result:

Result of combining the 3 rows
If all of the rows you combining are "custom horizontal buffer", then the combined row will also be "custom horizontal buffer" and all of the layers of the source rows will be brought together and rendered as a matrix.
If all of the rows you combining are "custom vertical buffer", then the combined row will also be "custom vertical buffer" and all of the layers of the source rows will be brought together and rendered as a matrix.
Reverse Selected Rows
Use this menu item to reverse the order of the selected motion rows. In Overlay mode, this will change which row is the background and which is the foreground; likely changing the way your motion effects are rendered.
Copy/Paste the Motion Row Configuration
You can copy the contents of the motion effect row table to the clipboard, and then use the paste button to append the data into the Motion Effect Row dialog for another prop. This can be useful when you want to:
•copy motion effect rows defined in a sequence to the motion effect row defaults for a prop or group, so they will be applied whenever a new sequence is created.
•copy motion effect row defaults you just created on a prop or group into existing sequences.
•copy motion effect rows defined in one sequence to the motion effect rows for a same prop or group in another sequence.
•copy motion effect rows defined on one prop to other props with the same shape and dimensions. For example, you might define some motion effect rows for a pixel-based mini-tree and copy those rows into your other mini-trees.
Let's take the second situation as an example -- you added motion effect row defaults to a prop. New sequences will use those defaults, but you need to get them into an existing sequence. Here are the steps to follow:
1) open the existing sequence
2) double click on the name of the prop to open Prop Definition
3) click on the "Motion Effect Rows" button in Prop Definition
4) click on the first motion row
5) shift-click on the last motion row, which should select all rows
6) select Edit > Copy from the menu
7) click "Cancel" to close the Default Motion Rows window
8) click "Cancel" to exit Prop Definition
9) back in the sequence, right-click on the prop name and select "Add/Modify motion effect rows" from the menu
10) select Edit > Paste from the menu. All of the rows copied in step 6 should now appear in the list
11) click the "Save" button to return to the sequence