Sequences in S5 and later versions are stored in a different format and have a different file extension than in prior versions.
S5 and later |
Older Versions |
|
|---|---|---|
Musical Sequences |
LOREDIT |
LMS |
Animation Sequences |
LOREDIT |
LAS |
Sequence File Extensions
Therefore, sequences created with prior versions must be upgraded. You do this by selecting File > Open from the main menu, and then selecting the LMS or LAS file you want to upgrade. After opening the file, you will be presented with the following dialog:

The Upgrade Legacy Sequence Dialog
The name of the sequence being upgraded is shown at the upper right. The 3 steps that make up the upgrade process are shown across the top of the dialog. The current step shown with regular text, and the other steps are grayed out. You move from one step to the next by clicking the red "Next Step" button. There is no "back" button -- if you need to return to a prior step, click the "Cancel" button and start over.
Your goal should be to end up with no items in the "Not Matched" list. You can do this by:
•choosing a preview in step 1 that matches all of the channels in the sequence being upgraded, or
•adding the unmatched channels to the preview in step 2
If there are still channels listed in the in the "Not Matched" list when you go to step 3, those channels will get "archived". Archived channels cannot control lights, but they preserve the effects that were in the original sequence. You will get a message at the end of the upgrade process listing any channels that were archived. For more information on archived props, see the Archived Props and Manage Archived Props Dialog topics.
The 3 steps are described in more detail below:
1.Choose a preview for the sequence
2.Modify the preview if needed
3.Create the S5 sequence. Moving to this step closes the Upgrade window, processes your inputs, and displays the upgraded sequence in a tab of the main program.
If the resulting S5 sequence doesn't turn out the way you expected, you can always go back and try upgrading the sequence again - adjusting the process to achieve a better result.
A Brief Word About Previews
S5 sequences require a preview - this is new to S5. A preview specifies all of the channels that will be used in the sequence (among other things). You can create a preview during the upgrade process or you can create one ahead of time.
One preview can be associated with multiple sequences.

So if you had 3 sequences in your 2018 show that you are upgrading to S5, you only need one preview that will be shared with all 3 sequences.
Step 1: Choose a Preview for the Sequence

Step 1: Choose a preview
The first step is to decide whether you will upgrade the sequence using an existing preview, or start from scratch and create a new preview. If you decide to create a new preview, the preview name field defaults to the name of the sequence, but you can change this to anything you want.
Try selecting several different previews from the existing previews list. As each one is selected, the "Matched" and "Not Matched" lists will be automatically updated to show you how well the preview matches up to the sequence you are upgrading.
If you choose to create a new preview, you don't have to start from scratch. You can easily import Visualizer files, an SE block-style animation, and/or a Pixel Editor preview into the new preview to help you get a quick start.
If you create a new preview during the upgrade process, you only need to do that for the first sequence you upgrade. Subsequent sequences will likely use the same set of channels, so you should select the preview you created while upgrading the first sequence.
Step 2: Modify The Preview If Needed
Your goal when modifying the preview should be to end up with an empty "Not Matched" list. You can shrink the "Not Matched" list by:
•Importing a Visualizer file, SE animation, and/or Pixel Editor preview that contains channels that match the sequence, or
•Selecting an unmatched channel and drawing it as a light string on the design canvas, or
•Selecting an unmatched channel and drawing it as a flood light on the design canvas, or
•Selecting one or more unmatched channels and designating them as beat channels
•Selecting one or more unmatched channels and having the tool auto-generate props for them
There are many tools on this screen to help you modify your preview. To help keep things organized, we've broken the down this topic into sections:
•Add a background image and adjust its brightness
•Import the block-style animation stored in the legacy sequence (if there is one)
•Import the Pixel Editor preview (if there is one)
•Draw a string for the selected channel
•Draw a flood light for the selected channel
•Auto-generate props for the selected channels
•Designate channels as "beat channels" that don't control lights, but mark the beat of the music
•Select, move, and resize items on the Design Canvas
•Align items using the Format menu
After you have modified the preview here, you can always make further modifications later using the Preview Design tool.
Modify The Preview: Add a Background Image
![]()
Click this button to add a background image to your preview. This can help with placement of your light strings and make your preview look more realistic.
![]()
If you have assigned a background image to your preview, you can use this slider to adjust the brightness of the image. Move the Brightness slider to the left to dim the background image, simulating the view of your display during nighttime. The buttons on the left and right will modify brightness up or down one step at a time. Image brightness can also be changed from other areas of the program.
Modify The Preview: Importing

Click one of the buttons to start an import. If the sequence being upgraded doesn't have a block-style animation, the Animation button will be disabled. If the sequence doesn't have an associated Pixel Editor file, the Pixel Editor button will be disabled.
Import an S3 / S4 Visualizer file
If you have created a Visualizer file that defines all (or some) of the channels in the sequence being upgraded, you can select this option. You can also use this option to import Visualizer prop and fixture files.

A sample Visualizer file
Import a block-style animation created with the Sequence Editor
If the sequence you are upgrading has an animation in it that you created with the Sequence Editor, it can be imported into the preview. If there is no animation in the sequence file, then this option will be grayed out.

A sample animation in the Sequence Editor
Import the Pixel Editor preview
If the sequence you are upgrading has an associated Pixel Editor file, you can import the Pixel Editor preview.
A sample Pixel Editor preview
Modify The Preview: Unmatched Channels

Toolbar for the Unmatched List
Select one or more channels
Click on an item in the Unmatched list to select it. Ctrl-click on addition channels to add them to the selection. Or you can use Shift-click to add a range.

The Select Menu
From the Select menu you can:
•Select all items in the list
•Select channels with a particular word in their name. You will be prompted for the word.
•Clear the selection
Sort Channel List
Click the top of a heading to sort the items by the values in that column. Click the the column heading a second time to reverse the sort order.
Draw a string for the selected channel
![]()
Select a channel in the Unmatched list, then click this icon. Then move your mouse pointer over the design canvas and notice cursor change to the edit cursor. Click on the design canvas to start drawing your string. A single click of the left mouse button will insert a node (vertex) into the line and allow you to continue drawing the next segment. To stop drawing, double-click the left mouse button or use the ESC key. When you stop drawing, the Matched and Not Matched lists will update.
Select the string you have drawn by clicking on or near it, then you can drag the nodes (small red squares) around to change the shape of your string.
If you don't like the string you have drawn and want to start over, just click the Undo button.
Draw a flood light for the selected channel
![]()
Select a channel in the Unmatched list, then click this icon. Then move your mouse pointer over the design canvas and notice cursor change to the edit cursor. Click once on the design canvas to place the flood light. The Matched and Not Matched lists will then update.
Select the flood light you have drawn by clicking near the center of it. Once selected, you can drag it around to adjust its position, or use the arrow keys to make finer adjustments.
If you don't like the flood light you have drawn and want to start over, just click the Undo button.
Auto-generate props for the selected channels
Auto |
The fastest way to create a preview is to select all of the unmatched channels, then click the Auto button. The preview won’t look like your house, but channel information will be set correctly and it will allow you to get started with your sequencing right away.
Note that you can auto-generate the preview for a subset of channels if needed. Just select the desired channels, then click the Auto button.
, and the corresponding auto-generated preview (right)")
A sample Sequence Editor file (left), and the corresponding auto-generated preview (right)
Beat Channels
![]()
Beat channels are new to S5. In the S4 Sequence Editor, when you wanted to represent the musical beat, you just used a regular channel to do that. In S5, beat channels are a separate row type in the grid. They are intended to hold sequence effects related to the beat of the music; however, you can put any regular channel effect anywhere you want in a beat channel. Beat channels can only be added to musical sequences.
To designate one or more channels as beat channels, select them in the Unmatched list, then click the music note button. They will not be shown on the design canvas, but they will be listed in the "Matched To Preview" section with the Preview Prop column showing "<Beat Channels>".
Modify The Preview: Using the Design Canvas

The Design Canvas and Toolbar
Select, move, and resize items on the Design Canvas
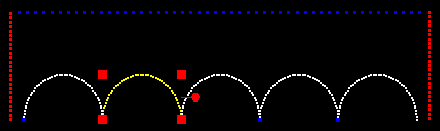
In the picture above, there is 1 blue string, 2 red strings, and 5 RGB arches. The second arch is selected.
In the preview design window, traditional strings (incandescents, LEDs, strobes) are displayed with the color of the string (e.g. a string of red LEDs will show as red). RGB pixels and dumb RGB strings are displayed in white. Any string that has been selected, traditional or RGB, is shown in yellow.
The selected item is always shown in yellow and has 4 red scaling “handles” at the corners (lines just have 2 handles) and a rotation handle to the right. You can select multiple props by holding the Shift key down while clicking additional items.
If a single prop is selected, its name will be displayed just above the design canvas. If multiple props are selected, this area will show "<Multiple>".
The selected prop(s) can be dragged around the design canvas using the mouse. They can be resized by dragging any one of the 4 red handles in the corners, or by using the Ctrl-UpArrow and Ctrl-DownArrow keyboard shortcuts. You can rotate them by dragging the handle on the right side, by using the Format > Rotation menu, or by using the Ctrl-LeftArrow and Ctrl-RightArrow keyboard shortcuts. If you have multiple props selected, you can align them in many ways using the Format menu.
Any movement, scaling, or rotation action can be undone by clicking the undo button or using the Ctrl-Z keyboard shortcut.
Zoom in and out
![]()
![]()
You can zoom in on your props to make fine adjustments. When zoomed in, use the scroll bars to move around the preview.
Format Menu
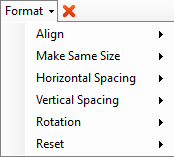
Align - If multiple props are selected, the items on this sub-menu allow you to align those props in various ways.
Make same size - If multiple props are selected, the items on this sub-menu allow you to resize the selected items such that they all have the same width, height, or both.
Horizontal spacing - If multiple props are selected, the items on this sub-menu allow you to make the horizontal spacing between them equal, or to remove any space between them (so they abut one another).
Vertical spacing - If multiple props are selected, the items on this sub-menu allow you to make the vertical spacing between them equal, or to remove any space between them (so they abut one another).
Rotation - After selecting 1 or more props, the actions listed under the “Rotation” menu allow you to rotate the selected items back to their default orientation (0 degrees), to 90 degrees right, or 90 degrees left. Selected props can be rotated to any angle by dragging the rotation handle that is displayed when they are selected or using the keyboard shortcuts Ctrl-LeftArrow and Ctrl-RightArrow. Ctrl-0 (control key + zero key) is a shortcut for resetting rotation back to the default orientation (0 degrees). Note that freeform prop shapes do not have a default orientation, so the Rotation > 0 command has no effect on them.
Reset - After selecting 1 or more props, the actions listed under the “Reset” sub-menu allow you to reset the selected items back to their default position (centered), or default size (half of the canvas size), or both.
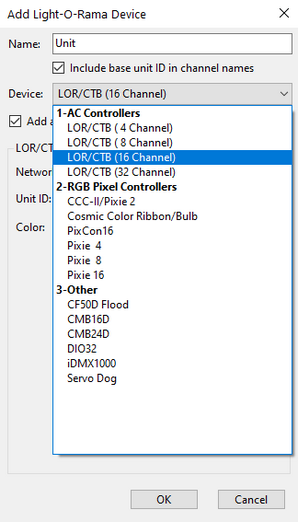
Add Items
![]()
Click on the plus icon to add a Light-O-Rama controller to the preview. After adding the controller, its channels will automatically be matched up with those in the sequence.
Delete items
![]()
You can delete one or more items by selecting them on the design canvas, and then clicking the delete button or pressing the Delete shortcut key. If you delete an item by mistake, you can always click the Undo button.
Undo/Redo
Adds, deletes, movement, scaling, and rotation can be undone and redone.
![]() clicking this icon undoes the last operation, and has the keyboard shortcut Ctrl-Z.
clicking this icon undoes the last operation, and has the keyboard shortcut Ctrl-Z.
![]() clicking this icon reapplies an operation that was previously undone, and has the keyboard shortcut Ctrl-Y.
clicking this icon reapplies an operation that was previously undone, and has the keyboard shortcut Ctrl-Y.