In the Light-O-Rama SuperStar Sequencer, the layout settings get saved into each .sup file. The layout you set also gets saved as a default layout. This default layout will be used for new sequences that you create.
CCR Mode
In CCR mode, the screen will use the layout you have selected in the lower part of the Layout dialog box. The unit ID and configuration information will be obtained from the Configuration dialog box, and this information will be used when exporting the file to the Sequencer.
Number of Ribbons (1-24)
This will set the number of rows of ribbons if in horizontal view, or the number of columns of ribbons if in vertical view. Note that if you are using half ribbons, this setting is the number of rows, not the number of ribbons.
Ribbon Orientation
Setting "Vertical" will display the ribbons vertically in columns.
Setting "Horizontal" will display the ribbons horizontally in rows. Note that the star is not supported in the horizontal view.
Ribbon Shape
Setting "Straight" will display the ribbons in straight lines. This is the common way to display the ribbons.
Setting "Circle" will display the ribbons in circles. The start of the ribbon will be at the left center of each circle. This allows for a variety of circular patterns. Sequencing circles can be a challenge, but the results can be amazing. An example can be seen on the Light-O-Rama website with Deck the Halls for 2 CCRs and for 4 CCRs.
Ribbon Length
Setting "Full" will display the ribbons as a full length 50 pixel ribbon. This is the normal setting.
Setting "Half" will display the ribbons as a half length 25 pixel ribbon. The common use of this setting is to allow a matrix with fewer ribbons. For example, using 4 CCRs you can create a matrix of 8 rows with 25 pixels in each row. You can cut the ribbons per the instructions that come with the CCRs, but if you do this, you void the warranty. Another option is to loop the ribbons back without cutting them. You will lose some pixels in the loop, but you will not void the warranty.
When using half ribbons you must lay out your ribbons as diagrammed below:
Location of Ribbon Controllers when Ribbon Length is Set to Half and Ribbon Orientation is Set to Horizontal
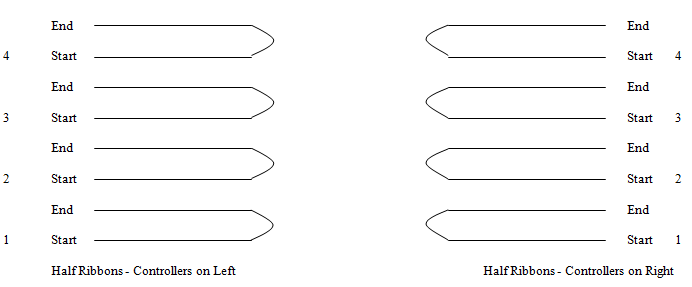
•Set "Left" if your CCR controllers are on the left end of your ribbons.
•Set "Right" if your CCR controllers are on the right end of your ribbons.
•Note that for a horizontal layout, the first controller should be at the bottom, and the last controller at the top.
Location of Ribbon Controllers when Ribbon Length is Set to Half and Ribbon Orientation is Set to Horizontal
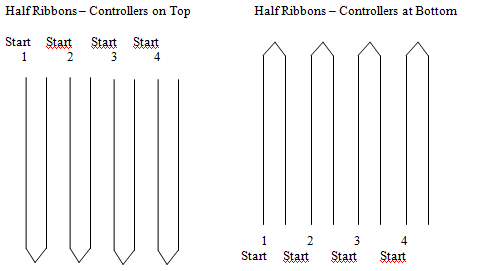
•Set "Top" if your CCR controllers are on the top of your ribbons.
•Set "Bottom" if your CCR controllers are on the bottom of your ribbons.
•Note that for a vertical layout, the first controller should be at the left, and the last controller should be at the right.
Visualization Mode
In visualization mode, the screen will use the row visualization file you have imported. All unit ID and configuration information is obtained from the real visualization file, and this information will be used when exporting the file to the Sequencer.
Visualization Files
This area shows the names of the row visualization and the real visualization. The row visualization should be laid out in rows, and is used when SuperStar maps the fixtures to the sequencing grid. The real visualization should be laid out the way your light display actually appears, and is used when playing the sequence and when exporting the sequence. Note that the row visualization and the real visualization will be the same file if you do "Import Visualization" in the File menu. If you do "Import Visualization Pair" in the File menu, then you can specify different files for the row visualization and the real visualization.
Pixel Extender
The Pixel Extender allows you to stretch or shrink the pixels in a region of a sequence done on a visualization. While you can stretch or shrink the pixels, the most common use is to stretch or extend the pixels. For example, it allows you to convert a sequence written for 25 or 50 pixels on strings that have 100 or 150 pixels.
•Enable Pixel Extender: Select this to enable the Pixel Extender.
•X Origin: The X origin of the region to be extended.
•Y Origin: The Y origin of the region to be extended.
•Width: The width of the region to be extended.
•Length: The length of the region to be extended.
•Stretched/Shrunk Length: The new length after the region has been stretched or shrunk.
Pixel Extender Example
Make a visualization of your CCP Tree that has 50 pixels per strand.
Load the standard sequence made for a CCP Tree with 25 pixels per strand.
Import your visualization of your CCP Tree that has 50 pixels per strand.
Set the Pixel Extender as follows:
•X Origin: 0
•Y Origin: 16 (this is because the Globe is at the top of the sequencing grid and the CCP Tree starts at row 16)
•Width: 24
•Length: 25
•Stretched/Shrunk Length: 50
At this point, you can play the sequence to your visualization and see the stretched pixels play to your visualization.