When using a Custom shape, Advanced shape, or Tree 360 Panels shape on the Prop Definition window you will click a button to open the Custom Grid Window:
•For a Custom shape, you are using the grid to define the placement of your lights.
•For an Advanced shape, you are using the grid to define the placement of pixels in the effect buffer.
•For a Tree 360 Panels shape, you are defining the location of lights on a single panel.

Button that opens the Custom Grid Window

Custom Grid Window
Entering Grid Data
To define the shape, place a number in each cell where there is a light or pixel. A number can be entered into a cell by:
•Clicking on a cell and entering the number using the keyboard
•Using the cut, copy, and paste buttons
•Using the auto-numbering feature
Traditional & Dumb RGB Lights
For props that use traditional strings or dumb RGB lights, the number you enter in the custom grid is the string number. So if you were defining a candy cane made using a single incandescent string or a single dumb RGB string, then all of the numbers in the grid would be “1”, as in the picture below.
If this prop had a second string connected to another channel, you would use the number "2" to represent that string.

Custom Candy Cane-Traditional Lights
RGB Pixels
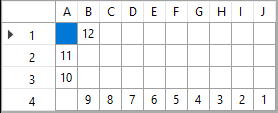
The picture below shows a candy cane with 12 RGB pixels. For RGB pixels, the number you enter is the pixel number: 1 for the first pixel, 2 for the second pixel, etc.
Custom Candy Cane-Pixels
Multiple Pixel Strings
When you have multiple strings of RGB pixels: numbers 1-999 represent pixels on the first RGB string; 1001-1999 represent pixels on the second RGB string; 2001-2999 represent pixels on the third RGB string, etc. You cannot represent a string with more than 999 pixels when using a Custom shape, Advanced shape, or Tree 360 Panels shape.

A pixel matrix with 4 strings of 10 pixels each
The Toolbar
Cut, Copy, Paste
![]()
Within the custom grid you can use the cut, copy and paste buttons (or their keyboard shortcuts) to move blocks of data around the grid. You can also use them to move data to and from an external spreadsheet (like Microsoft Excel).
Grid Menu

The Custom Grid Menu
From this menu you can:
•Select All - selects all grid cells
•Add Offset To Selection - prompts for a number (can be positive or negative), and then adds that number to the selected cells. This can be used to change the string assigned to the selected cells.
•Flip Selection Vertical - flips the selected cells vertically. Using the example at the beginning of this topic: a right-side-up candy cane will become an upside-down candy cane.
•Flip Selection Horizontal - flips the selected cells horizontally. Using the example at the beginning of this topic: a candy cane facing left will become a candy cane facing right.
•Transpose - flips the entire grid so that the rows become columns and the columns become rows. Here is the original candy cane example transposed:
•Crop - deletes any blank rows at the top or bottom, and any blank columns on the left or right
•Shrink - imported custom props are often defined with a very sparse matrix (lots of blank cells). This can cause the Sequencer to perform lots of unnecessary calculations while you are sequencing. To increase performance, it is beneficial to decrease the size of the grid as much as possible. Use the Crop function first. Then try the Shrink function -- this will reduce the number of cells in the grid by 50% in both width and height. Then try the Shrink function again. It often possible to use it several times to greatly reduce the number of cells. If it is not possible to reduce further, it will display a message.
Grid Size

The grid size controls
Using these controls you can:
•Change the width of the grid - adds or removes columns
•Change the height of the grid - adds or removes rows
•Change the size of the grid cells - make them smaller or larger
Using a Background Image
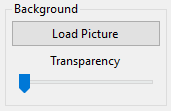
Using a background image can make placing the numbers in the grid much easier. Simply click the Load Picture button to load a picture of your prop. The selected picture will be used as the background of the grid. Acceptable file formats are JPG, PNG, and BMP. Then adjust the Transparency slider so that the background image and the numbers you type in can both be seen.

A background image made partially transparent, and numbers entered for part of the outline
Auto-numbering
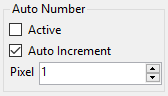
When auto-numbering is active (i.e. the Active box is checked), you can just click on a cell with the left mouse button to insert a number. If Auto Increment is checked, then the pixel number will automatically increment after every mouse click. In general, Auto Increment should be unchecked when creating a custom grid for traditional lights, and checked when creating a custom grid for pixel-based props.
Keyboard Shortcuts
Use these shortcut keys to navigate and modify the grid.
Key |
Action |
||||||
|
Use the arrow keys to move one cell in the direction of the arrow |
||||||
Move to the first cell in the current row |
|||||||
Move to the last cell in the current row |
|||||||
Move up 1 screen |
|||||||
Move down 1 screen |
|||||||
Expand the selection by holding down the shift key while using any of the keys listed above |
|||||||
Deletes the contents of the selected cells |
|||||||
|
Selects the entire grid |
||||||
|
Cut |
||||||
|
Copy |
||||||
|
Paste |