Some Light-O-Rama controllers have special options that can be configured. You can use the "Configure" tab of the Hardware Utility to do so, using the following steps:
•If you haven't already done so, plug a Light-O-Rama USB adapter into an available port. Connect a Cat5 or Cat6 cable from the adapter to the controller. Plug the unit into an AC outlet, and turn the unit on.
•Open the Light-O-Rama Control Panel and navigate to the Hardware Utility section.
•Make selections in the Ports to Scan and Scan For boxes.
•Click the "Scan" button
•Wait for results to appear at the bottom of the page
•Find the device that you are going to configure/test and click the "Configure" button

Click the "Configure" button to access trigger configuration and test
•After clicking the "Configure" button, the next screen you see will depend on the type of controller you are configuring:
oConfiguring Pixie Controllers (2, 4, 8 and 16), as well as CCR II Ribbons, Bulbs, Pixels
oConfiguring Original Cosmic Color Ribbons, Bulbs, and Pixels
oConfiguring Light-O-Rama MP3 Directors
Configuring AC Controllers
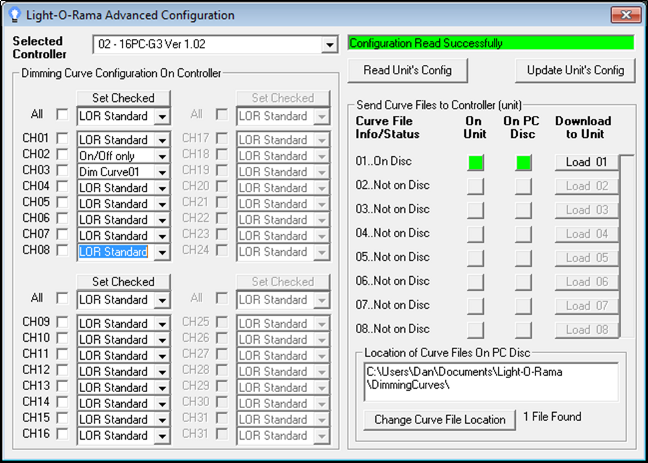
The Hardware Utility's Advanced Configuration screen can be used to set dimming curves for Gen3 controllers (e.g. CTB16PCg3, LOR800Wg3, LOR1600Wg3, and LOR1602Wg3), or for pre-Gen3 controllers that have Gen3 firmware installed.
Dimming curves determine the output of a channel versus the intensity setting of that channel. For example, the On/Off only curve has the output set at 100% for intensity values greater than 50% (or DMX 128), and the output at 0% for any other intensity value.
Each channel can be configured for a specific dimming curve. Gen3 firmware comes with three curves: "LOR standard" (which is normal for incandescent lights), "Dim Curve01" (which is a good curve for LED Lighting), and "On/Off only" (which is best with loads such as strobe lights that should never be dimmed).

AC configuration screen
Set the Minimum and Maximum Intensities
While active, the controller will not set its lights' intensities below the specified minimum. If, however, it loses communications with its director, it will turn them off (i.e. 0% intensity). The lights are not turned up to the minimum until the unit receives its first lighting command.
Setting a maximum intensity below 100% may be used to help prolong the life of bulbs, although there is an important exception: Retro LED C7 and C9 bulbs (also known as replacement LEDs) can be harmed by using them at any intensity other than 100% or 0%.
The initial values displayed in this section are read from the controller itself (although this is supported only for certain versions of firmware - your controller may need a firmware update in order to read the values from the controller).
Configuring Pixie Controllers (2, 4, 8 and 16), as well as CCR II Ribbons, Bulbs, Pixels
Pixie 2, 4, 8, and 16 controllers (the Pixie 2 is sometimes referred to as "CCR II") have their own configuration options unique to them.

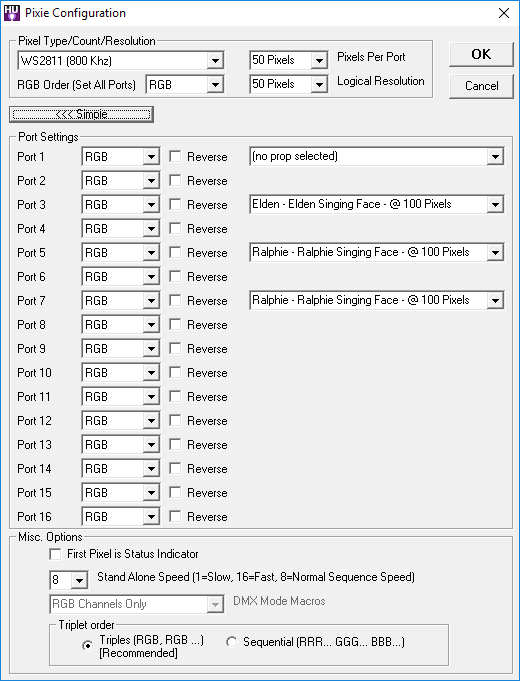
Pixie Controller configuration screen
For most users, simple mode will be all that is needed. Not all devices support all options. If a device does not support a particular option, that option is gray and cannot be used. Here is a description of each field:
•Pixel Type: Select the type of pixels connected to your Pixie controller. "WS2811 (800 Khz)" is the most common type - if you purchased your pixels from Light-O-Rama with your Pixie controller, this is the option you should choose. If you purchased your pixels elsewhere, check the documentation from your vendor.
•RGB Order: Each pixel uses 3 channels - one for red intensity, one for green intensity, and one for blue intensity. Pixel strings/strips from different manufacturers may have red, green, and blue channels set in a different order. Here you can set the order that matches the pixels you are using. RGB is the default. Selecting an option here will set ALL ports on the Pixie device to the same order; click the Advanced button if you have pixel strings with a mix of different channel orders.
•Pixels Per Port: the maximum number of pixels connected to any physical port of the Pixie controller. This can be any value 1-170. For example, if you have 50 pixels attached to each port, set this field to 50. If you have 50 on one port, and 150 on another, set this field to 150 (i.e. the maximum number you have on any one port of the controller). If you have selected a singing face using Advanced Mode (see below), then this value will be forced to 100.
When using a Pixie controller to control Light-O-Rama singing faces (trees or pumpkins), the Pixels Per Port must be set to 100 for proper operation.
Advanced Mode
If you press the 'Advanced' button, the dialog expands and shows the following:

Pixie controller: Advanced configuration
•First Pixel is Status Indicator: For Cosmic Color devices, if this field is checked, for the first minute after the unit is powered up (or until a lighting command is received), the first pixel of the unit will act similarly to the unit's status indicator, blinking on and off if there is no communication, and holding on steady if there is.
•Dumb RGB Mode: To control every pixel on a string (normal operation) or to control Light-O-Rama singing faces leave this setting "Off". Choosing one of the other values will make each string of pixels on the Pixie controller act as a single pixel, using just 3 channels (red, green and blue) to control the entire string. All pixels will still light up, but every pixel on a string will be the same color.
oCMD24D Emulation: Pixie 2 - 1 unit id / 6 channels, Pixie 4 - 1 unit id / 12 channels, Pixie 8 - 1 unit id / 24 channels, Pixie 16 - 2 unit ids / 24 channels each. When in this mode, the controller will respond to commands on an Enhanced (ELOR) or Not-Enhanced (LOR) network.
oEach Port acts as 1 Pixel: Each port still retains its own unit ID, but only 3 channels can be controlled per port. This option was referred to as "Logical Resolution = 1" in earlier versions. This mode is only active on Not-Enhanced (LOR) networks. When on an Enhanced (ELOR) network, pixels will respond individually.
In the list of ports you will see 1 line for each port that your Pixie has. For example, if you are configuring a Pixie 4, you would only see ports 1-4. Depending on the firmware your Pixie has, you may not be able to change all of these. Only newer Pixie firmware allows for the configuration of per port RGB Order as well as prop selection. If your version of the firmware does not support these, the Advanced button will not be displayed.
For each port you can configure:
•RGB Order: Order of the Red Green and Blue channels for your pixel. RGB is the default. Selecting an RGB order effects only that port. That means each port on your Pixie can have a different RGB order.
•Reverse: Reverses the order of the pixels on the ribbon, or string connected to that port of the Pixie. Thus, when unchecked, pixel 1 is nearest the controller, and when checked, the highest pixel is nearest the controller.
•Prop: Pixie controllers can be configured to run certain available LOR props, like singing faces. Selecting the prop here will allow the pixie to control that prop on that and the next port. If you have a pixie 16, props are only supported on the first 8 ports. For more information, please see the manual that came with your LOR prop. For regular operation select 'no prop selected', otherwise select the name of the prop connected to that and the next port.
Configuring Original Cosmic Color Ribbons, Bulbs, and Pixels
Cosmic Color Ribbons, Bulbs, Pixels, have their own configuration options, unique to them.
There are currently 2 versions of Cosmic Color devices available, the 'Original' and the Cosmic Color 2 devices which are based on our Pixie controllers. The Hardware Utility can distinguish the difference between the two when connected to your computer and will present you the correct dialog.
When you press the "Configure" button with an Original Cosmic Color device selected, you will be presented the following window:

Cosmic Color Ribbon/Bulb/Pixel/Pixie configuration options
For details on these options, please refer to your device's manual (All of our hardware manuals are available on our website in PDF format here:http://www1.lightorama.com/documentation/ ). Not all devices support all options. If a device does not support a particular option, that option is grey and can not be used. Here is a brief overview of each:
•Unit ID Mode: In "Normal" mode, the Cosmic Color device will be a single unit ID, with 157 circuit IDs for a one-string CCD or 314 for a two-string. In "Legacy" mode, the Cosmic Color device will use up to ten sequential unit IDs per string (depending upon the configured resolution), with up to 16 circuit IDs for each unit ID. In "Dual Normal" mode, which is applicable for two-string CCDs, the device will have two contiguous unit IDs, each having 157 circuit IDs.
•Logical Resolution: The number of logical pixels that the Cosmic Color device will be. For example, setting it to 50 will give individual control over each of the 50 physical pixels, using 150 channels (one red, one green, and one blue for each pixel), while setting it to 1 will make all of the lights on the Cosmic Color device act as a single pixel, using three channels (red, green and blue).
Advanced Mode
If you press the 'Advanced' button, the dialog expands and shows the following:

Cosmic Color Ribbon/Bulb/Pixel/Pixie advanced configuration
•Reverse String #: Reverses the order of the pixels on the ribbon, or string of the Cosmic Color Device. Thus, when unchecked, pixel 1 is nearest the controller, and when checked, the highest pixel is nearest the controller.
•DMX Mode: Selects how the Cosmic Color device will appear in a DMX universe: just the RGB channels, just the Macro channels, or both.
•First Pixel is Status Indicator: For Cosmic Color devices, if this field is checked, for the first minute after the unit is powered up (or until a lighting command is received), the first pixel of the unit will act similarly to the unit's status indicator, blinking on and off if there is no communication, and holding on steady if there is.
•CCP Color Correction: Select this option if you are using Cosmic Color Pixels and notice that colors are slightly off, especially when compared to a Cosmic Color Bulb controller.